
Studio breakdown
The three-camera podcast studio, end to end.
Three cameras, one switcher, isolated recording, and the power mistake that ends interviews early. Here is how the whole thing fits together, and what each piece is actually doing.
That is the short version. The rest of this page is the long one: every connection, where each piece stands in the room, and what to actually buy.
How it connects
One box sits in the middle of everything. Cameras and microphones go in, a switched program and separate per-camera files come out.
Camera 1, wideHDMIswitcher HDMI 1
Camera 2, hostHDMIswitcher HDMI 2
Camera 3, guestHDMIswitcher HDMI 3
Wireless receiver3.5mm line outswitcher MIC IN
SwitcherUSB-C1TB SSD, isolated files
SwitcherHDMI outmonitor, all shots and audio levels
Dummy batteriesmainsall three cameras
Power stripmainsswitcher and monitor
Where everything goes in the room
Three cameras, two key lights, one light on the background. Cross the two singles, keep the lights out of every frame, and leave real space behind the seats. Those three decisions do most of the work.
Camera 1, wide. Straight on, centred, far enough back to hold both seats in one frame. This is the shot you cut to when you are not sure.
Camera 2, host. Out past the guest, shooting back across the table at the host. Its frame stops before it reaches the guest.
Camera 3, guest. Out past the host, shooting the other way. Crossing the two singles is what makes an interview feel like a conversation instead of two monologues.
Key light 1. Front left, roughly 45 degrees off the seats, further out than any camera so it never appears in a frame.
Key light 2. Front right, mirroring the first.
Background light. Behind the seats and off to one side, aimed at the wall rather than at a person. It lifts the wall so nobody blends into their own background.
The seats. Angled slightly toward each other, and pulled well off the back wall. Sitting against the wall is the single most common reason a setup looks flat.
Control desk. Beyond the guest, so the host can glance at the monitor without turning away from the person they are talking to.
Do not forget the dummy batteries.
Camcorders tend to run continuously off mains power. Mirrorless and DSLR bodies do not. They run off a battery that will quietly die somewhere in the middle of your best answer of the interview.
A dummy battery is a fake battery with a power cable coming out of it. It drops into the same slot and runs the camera off the wall indefinitely. It is the cheapest part of this entire build and the one that saves the recording you cannot reshoot.
Why record everything separately
The switcher gives you a finished, already-cut program file. That alone is enough to post. The reason to record isolated files as well is that a live cut is a decision you made in the moment, and isolated angles let you change your mind later without a reshoot.
The same logic applies to audio. The wireless microphones are the audio you will actually use, but the camera microphones keep recording too. They exist so every file carries the same sound, which is what lets an editor line all three angles up in seconds instead of nudging clips around by eye.
Every piece, and what it is for
Some of these are the picks from our Video Studio Gear Guide, at the tier this build sits in. The tripods, stands, lighting and power come off the gear lists of studios we actually built and delivered, which is why a few of them are a step up from what the guide recommends.
The switcher and recorder
Blackmagic ATEM Mini Pro ISO
Every camera and the microphone run into this one box. It switches the live program and records each camera as its own isolated file at the same time.
The ISO in the name is the part that matters. Without it you get one mixed program file and no way to recut an angle afterwards.
The recording drive
Samsung T7 Portable SSD
An external SSD plugged straight into the switcher. Three cameras plus program lands at about eight hours of recording on a 1TB drive.
Record to the drive directly rather than to cards you have to offload. The switcher shows remaining hours on screen, so you always know where you stand mid-session. The T7 is what we put in builds, and any fast external SSD does the job. Size it by how long your sessions actually run, not by the biggest number you can afford.
Three cameras
Canon EOS R8 or Sony Alpha 7C
A wide shot that holds both seats, and a tighter single on each chair. That is the whole grammar of a two-person interview.
Mirrorless or camcorder both work. On lenses, the split we keep coming back to in real builds is a 35mm on the wide and a 50mm on each single: the wide takes in the room without bending faces at the edges, and the 50mm flattens a single just enough to look considered. A 24mm works on the wide too if the room is tight. What matters either way is that the three angles genuinely look different rather than three versions of the same framing.
Full frame, the pick
Three tripods
K&F 73 inch with a fluid head, Neewer 72 inch with a ball head, or the heavy duty Neewer 73 inch
One per camera. All three cameras here stand on the floor out in the room, so all three need a stand that reaches a seated person's eye level.
Around 72 to 73 inches of maximum height is the number to buy, and not because you will run it that tall. You want the headroom to set the lens at the seated subject's eye level and lock it there. Get that height right and an inexpensive tripod looks fine; get it wrong and no camera saves you, because shooting up a nose or down at a forehead reads as amateur long before anybody notices the picture quality. On the head, a fluid head is what you want if a shot will ever move, because it pans smoothly instead of in jerks, and a ball head is faster to level and lock on a camera you set once and leave. Put the heavy duty one under whichever body and lens combination is heaviest.
K&F 73 inch, fluid headNeewer 72 inch, ball headNeewer 73 inch, heavy duty
The monitor
A 24 inch 1080p monitor
Shows every camera at once plus live audio levels, so you can see what you are actually capturing instead of hoping.
Put it where the host can glance at it without turning away from the guest. Catching a soft focus or a dead mic mid-record is worth the desk space.
HDMI cables
Three runs from the cameras into the switcher, and one more from the switcher out to the monitor.
Check the port on the camera before you buy anything. Full size HDMI, mini HDMI and micro HDMI are all common on camera bodies, and the three cameras in this build will not necessarily agree with each other. In our own builds the tidiest answer is usually full size cables everywhere plus a micro HDMI adapter on whichever body needs one, because then a failed cable is a cable you can swap with any other on the shelf. Buy them longer than the distance you measured, 10 feet and up, because the cable has to reach around the room rather than across it. The run out to the monitor is the easy one: full size at both ends.
Three lights
Two Neewer FS150B or CB120B keys in 21.7 inch parabolic softboxes, plus a Neewer PL60C on the background
Two keying the set, one on the background. Two lights make faces look right, and the third stops you blending into your own wall.
This is the part of the list that changes most between a starter setup and a room we get paid to build, so here are both. A bare panel is the starter answer: cheap, small, and it works. What goes into our builds is a 150W light firing into a parabolic softbox, because the softbox is doing the real work. A big soft source wraps around a face and forgives somebody leaning out of their mark; a bare panel is a small hard source and punishes the same movement. Buy the softbox to match the light: the 21.7 inch one mounts straight onto an FS150B or a CB120B, and bigger rooms take a 33 to 36 inch version of the same thing. On the background, the PL60C is an RGB unit, which means you can put an actual colour on the wall rather than just more brightness. The PL60B is the same panel without the colour if you would rather keep it simple. Whichever you pick, the background light is the one people skip, and it is most of the difference between looking lit and looking flat.
What goes in our builds
Cheaper route
Neewer 13" LED panels
A two-pack. Two packs covers all three lights with a spare, and replaces the keys, the softboxes and the background light together.
A room light, optional
Neewer 26 inch lantern softbox
Not one of the three. A soft, roughly even wash over the whole space, for when the room itself is reading as a dark box behind two well-lit people.
A lantern throws light in every direction at once instead of in one direction like a softbox, which is exactly what you want for lifting a room rather than lighting a face. It is the thing to add when the set looks right on camera but the space around it does not. Skip it if your room already has usable ambient light, and never let it get bright enough to compete with your keys, because then you have flattened the faces the keys just shaped.
Light stands
K&F heavy duty, 3 to 9.2 feet, in a two-pack
One per light. Panels arrive with nothing to put them on, and this is the part people discover on the day.
Both of these come as two-packs, so two packs covers three lights and leaves you a spare, the same arithmetic as the panels. The reach is what separates them. The heavy duty pair goes to 9.2 feet, which puts a key light well above a seated head so it comes down at the face instead of across it, and the heavier base is what you want holding a softbox up high near people. The light duty pair tops out at 6.7 feet, which is plenty for the background light, since that one sits low and close to the wall and is aimed at the wall rather than at anybody. Check the footprint of the legs before you buy: in a small room the real constraint is that every stand has to live outside every camera frame, not what it costs. In a room that is permanently a studio, wall mounts or a ceiling mount beat stands outright, because they put the light exactly where you want it and give you the floor back.
Cheaper route: An Amazon light duty two-pack, 2.4 to 6.7 feet
Dummy batteries
Matched to the exact body, never universal
Mains power for each camera, in the shape of the battery it already takes.
Camcorders usually run continuously off the wall. Mirrorless and DSLR bodies do not, and a battery dying mid-interview is the one failure you cannot edit around. Buy the one that matches your exact body; the coupler is shaped like a specific battery and there is no universal version.
Power strips
Kasa Smart Power Strip HS300, plus a 25 foot extension cord
One at the set for the three dummy batteries, one at the desk for the switcher and the monitor.
Count the plugs before the shoot day. Three cameras, the switcher, the monitor and the lights add up faster than people expect, and a strip that is one socket short at the wrong moment costs you the session. We use smart strips in builds for one specific reason: you can kill the whole set from your phone and, better, bring it up in the same state every time instead of hunting for switches behind furniture. Run the set and the desk off separate strips rather than daisy chaining one into the other, and buy a longer extension than the room looks like it needs.
Wireless microphones
RODE Wireless GO
The real audio, running into the switcher alongside the video.
The thing that actually decides this purchase: the receiver must have a line out you can run into the switcher. Plenty of kits only output over USB-C to a phone, and those cannot join this setup at all. Keep the camera mics recording too; they sound worse, and that is fine, because their job is to be the sync reference in post.
Cheaper route: A DJI Mic 2 or Hollyland Lark does the same job
Want this in a guide you can take shopping?
The Video Studio Gear Guide is our free download covering cameras, lighting, audio and the accessories most setups forget, sorted by budget tier so you can buy once and buy right.
The same setup, built into a room.
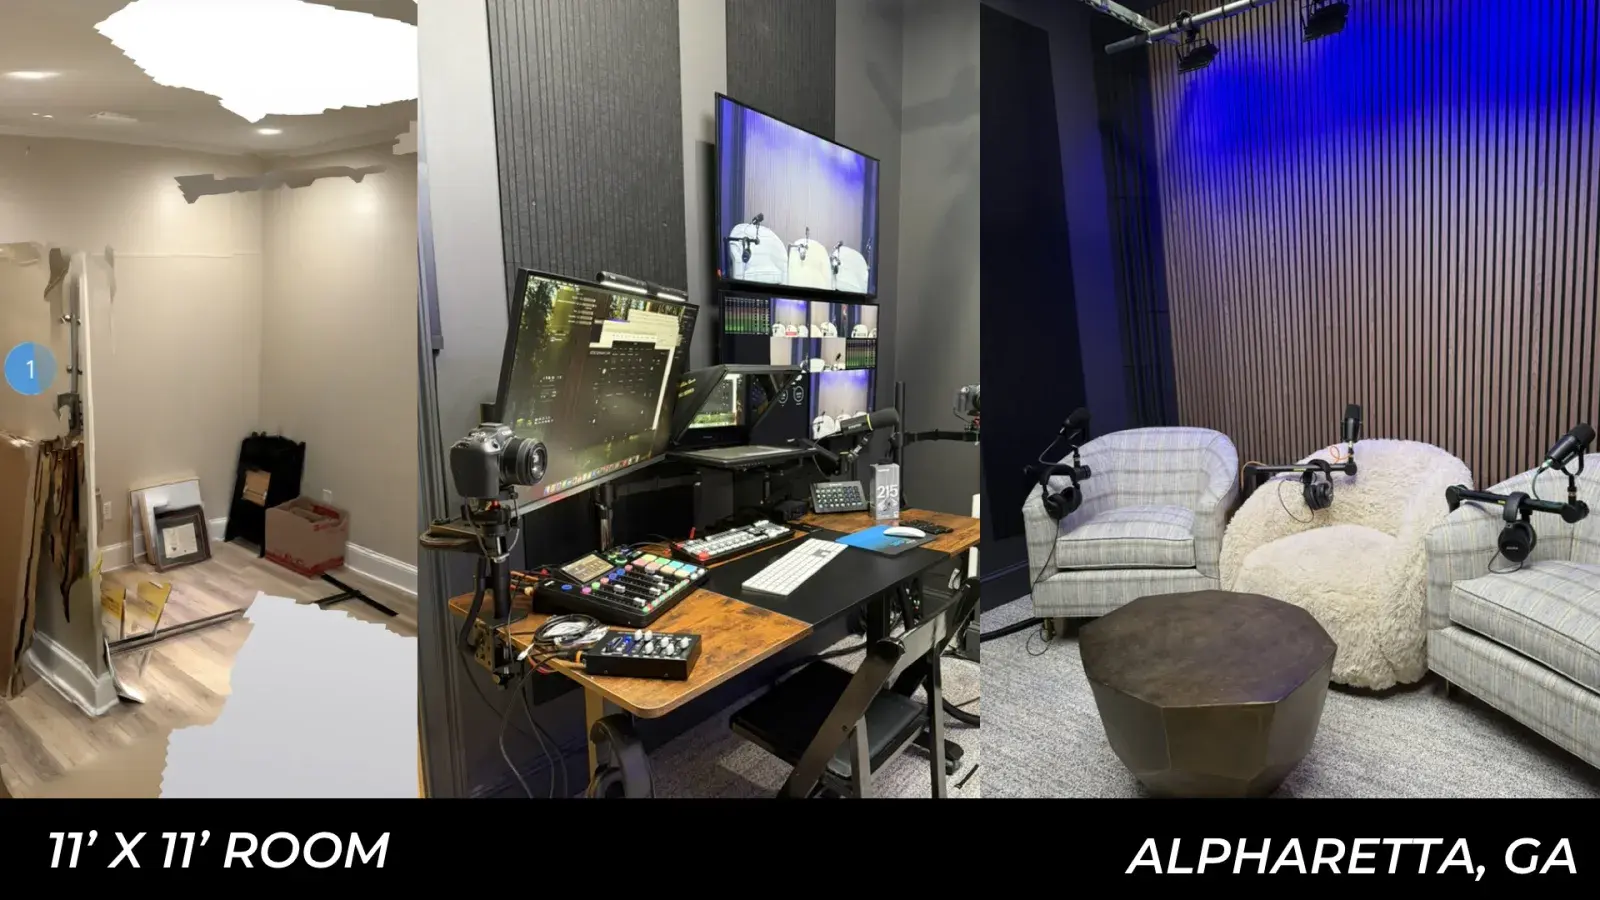
Everything above is the equipment side. This is what it looks like when the room is built around it: an empty 11 by 11 space in Alpharetta turned into a finished podcast set, with a wood-slat acoustic wall, a control desk running the switcher, multi-camera coverage, and a seating area that is actually lit.
 See the full 3PG Podcast Studio build
Or skip the research entirely.
We design, build, and install studios like this one for founders, executives, and established creators. You walk in and press record.