
Essential Equipment and Setup for Professional Video Creation
In today’s digital age, creating high-quality video content has become essential for anyone involved in podcasts, online courses, or virtual meetings. Having the right gear can make all the…
[et_pb_section fb_built=”1″ _builder_version=”4.16″ global_colors_info=”{}”][et_pb_row _builder_version=”4.16″ background_size=”initial” background_position=”top_left” background_repeat=”repeat” custom_padding=”||10px|||” global_colors_info=”{}”][et_pb_column type=”4_4″ _builder_version=”4.16″ custom_padding=”|||” global_colors_info=”{}” custom_padding__hover=”|||”][et_pb_text _builder_version=”4.16″ background_size=”initial” background_position=”top_left” background_repeat=”repeat” global_colors_info=”{}”]
In today’s digital age, creating high-quality video content has become essential for anyone involved in podcasts, online courses, or virtual meetings. Having the right gear can make all the difference, transforming a basic setup into a professional-looking studio that elevates the quality of your content. This guide will walk you through the essentials for a one-camera setup that will get you started with ease, whether you’re recording solo videos, podcasts, or live calls.
[/et_pb_text][/et_pb_column][/et_pb_row][et_pb_row _builder_version=”4.17.4″ _module_preset=”default” global_colors_info=”{}”][et_pb_column type=”4_4″ _builder_version=”4.17.4″ _module_preset=”default” global_colors_info=”{}”][et_pb_text _builder_version=”4.17.4″ _module_preset=”default” global_colors_info=”{}”]
1. Camera Gear Essentials
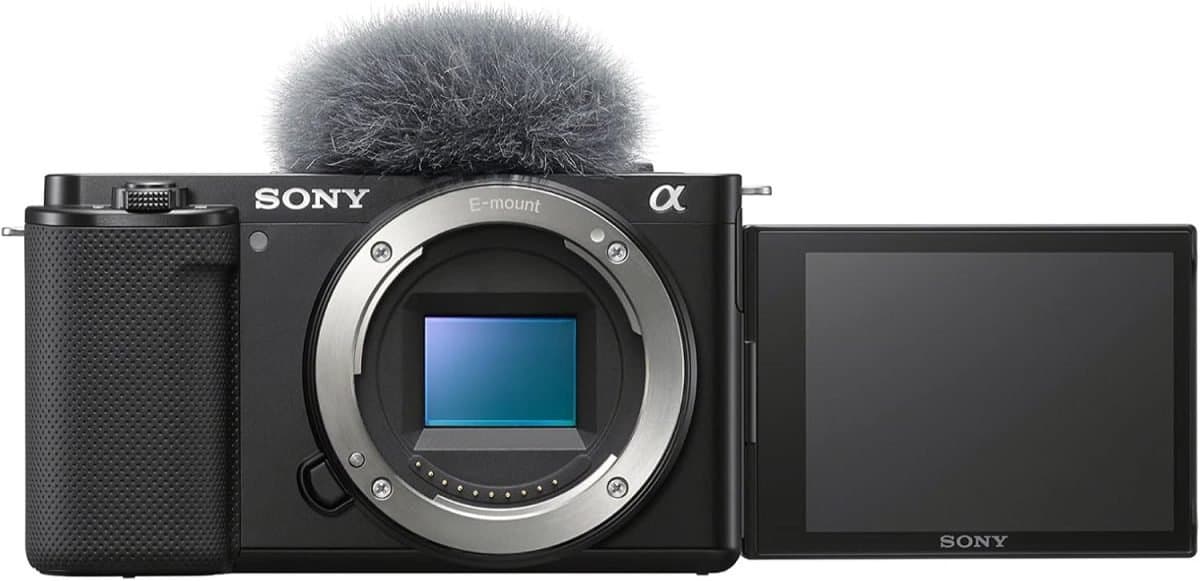
At the heart of any video production is your camera. The Sony Alpha ZV-E10 is a fantastic choice for creators looking to produce professional content. Known for its high-quality video capabilities, this camera delivers sharp images and excellent performance even in low-light environments. Pairing it with the Sigma 16mm F1.4 lens takes your visuals to the next level, providing crisp, vibrant shots with a beautiful depth of field.
[/et_pb_text][/et_pb_column][/et_pb_row][et_pb_row column_structure=”1_2,1_2″ _builder_version=”4.17.4″ _module_preset=”default” global_colors_info=”{}”][et_pb_column type=”1_2″ _builder_version=”4.17.4″ _module_preset=”default” global_colors_info=”{}”][et_pb_blurb title=”Camera: Sony Alpha ZV-E10″ url=”https://amzn.to/4eTlNmH” image=”https://homestudiomastery.com/wp-content/uploads/2024/10/image-scaled.jpeg” _builder_version=”4.17.4″ _module_preset=”default” link_option_url=”https://amzn.to/4eTlNmH” global_colors_info=”{}”]
The Sony Alpha ZV-E10 is a great camera for going from a webcam or a smartphone to a dedicated high-quality camera. this makes sure that you look sharp in all of your videos.
Link: https://amzn.to/4eTlNmH
[/et_pb_blurb][/et_pb_column][et_pb_column type=”1_2″ _builder_version=”4.17.4″ _module_preset=”default” global_colors_info=”{}”][et_pb_blurb title=”Lens: Sigma 16mm F1.4″ url=”https://amzn.to/3Na29r0″ image=”https://homestudiomastery.com/wp-content/uploads/2024/10/image-2-300×267.jpeg” _builder_version=”4.17.4″ _module_preset=”default” link_option_url=”https://amzn.to/3Na29r0″ global_colors_info=”{}”]
The Sigma 16mm F1.4 lens is not only a very fast lens thanks to its large aperture, but it’s also a fixed lens meaning you can just set it at one setting and forget it.
Link: https://amzn.to/3Na29r0
[/et_pb_blurb][/et_pb_column][/et_pb_row][et_pb_row _builder_version=”4.17.4″ _module_preset=”default” global_colors_info=”{}”][et_pb_column type=”4_4″ _builder_version=”4.17.4″ _module_preset=”default” global_colors_info=”{}”][et_pb_text _builder_version=”4.17.4″ _module_preset=”default” global_colors_info=”{}”]
2. Mounting and Stability
A stable camera is key to avoiding shaky footage. The ULANZI Desk Mount ensures your camera is securely placed, making it easy to maintain consistent framing during your shoots. Additionally, the ULANZI Claw Quick Release Plateallows you to easily swap the camera in and out of the mount, making adjustments between shoots effortless.
[/et_pb_text][/et_pb_column][/et_pb_row][et_pb_row column_structure=”1_2,1_2″ _builder_version=”4.17.4″ _module_preset=”default” global_colors_info=”{}”][et_pb_column type=”1_2″ _builder_version=”4.17.4″ _module_preset=”default” global_colors_info=”{}”][et_pb_blurb title=”Mount: ULANZI Desk Mount” url=”https://amzn.to/3BztXm8″ image=”https://homestudiomastery.com/wp-content/uploads/2024/10/image-3-300×300.jpeg” _builder_version=”4.17.4″ _module_preset=”default” link_option_url=”https://amzn.to/3BztXm8″ global_colors_info=”{}”]
The ULANZI Desk Mount ensures your camera is securely placed, making it easy to maintain consistent framing during your shoots.
Link: https://amzn.to/3BztXm8
[/et_pb_blurb][/et_pb_column][et_pb_column type=”1_2″ _builder_version=”4.17.4″ _module_preset=”default” global_colors_info=”{}”][et_pb_blurb title=”Quick Release Plate: ULANZI Claw Quick Release Plate” url=”https://amzn.to/4ew2lwO” image=”https://homestudiomastery.com/wp-content/uploads/2024/10/image-4-300×291.jpeg” _builder_version=”4.17.4″ _module_preset=”default” link_option_url=”https://amzn.to/4ew2lwO” global_colors_info=”{}”]
Additionally, the ULANZI Claw Quick Release Plate allows you to easily swap the camera in and out of the mount, making adjustments between shoots effortless.
Link: https://amzn.to/4ew2lwO
[/et_pb_blurb][/et_pb_column][/et_pb_row][et_pb_row _builder_version=”4.17.4″ _module_preset=”default” global_colors_info=”{}”][et_pb_column type=”4_4″ _builder_version=”4.17.4″ _module_preset=”default” global_colors_info=”{}”][et_pb_text _builder_version=”4.17.4″ _module_preset=”default” global_colors_info=”{}”]
3. Power and Connectivity
Nothing disrupts a recording session like running out of power. That’s why using a dummy battery is a great idea, it allows you to power your camera continuously. Additionally, you’ll want a capture card to ensure your footage is transferred in high resolution to your computer, along with HDMI cables for optimal connectivity. These tools provide a seamless workflow for streaming or recording your content.
[/et_pb_text][/et_pb_column][/et_pb_row][et_pb_row column_structure=”1_4,1_4,1_4,1_4″ _builder_version=”4.17.4″ _module_preset=”default” global_colors_info=”{}”][et_pb_column type=”1_4″ _builder_version=”4.17.4″ _module_preset=”default” global_colors_info=”{}”][et_pb_blurb title=”Power: Dummy Battery” url=”https://amzn.to/3Bqyyqv” image=”https://homestudiomastery.com/wp-content/uploads/2024/10/sonydummybattery-300×204.jpg” _builder_version=”4.17.4″ _module_preset=”default” custom_margin=”52px|||||” link_option_url=”https://amzn.to/3Bqyyqv” global_colors_info=”{}”]
The Sony ACPW20 AC dummy battery it allows you to power your camera continuously.
Link: https://amzn.to/3Bqyyqv
[/et_pb_blurb][/et_pb_column][et_pb_column type=”1_4″ _builder_version=”4.17.4″ _module_preset=”default” global_colors_info=”{}”][et_pb_blurb title=”Capture Card: Elgato Cam Link 4K” url=”https://amzn.to/4duJtgp” image=”https://homestudiomastery.com/wp-content/uploads/2024/10/image-6-300×191.jpeg” _builder_version=”4.17.4″ _module_preset=”default” custom_margin=”57px|||||” link_option_url=”https://amzn.to/4duJtgp” global_colors_info=”{}”]
Additionally, you’ll want a capture card to ensure your footage is transferred in high resolution to your computer. These tools provide a seamless workflow for streaming or recording your content.
[/et_pb_blurb][/et_pb_column][et_pb_column type=”1_4″ _builder_version=”4.17.4″ _module_preset=”default” global_colors_info=”{}”][et_pb_blurb title=”Cable: HDMI to HDMI” url=”https://amzn.to/3TYH7zd” image=”https://homestudiomastery.com/wp-content/uploads/2024/10/image-8-300×300.jpeg” _builder_version=”4.17.4″ _module_preset=”default” custom_padding=”0px|||||” link_option_url=”https://amzn.to/3TYH7zd” global_colors_info=”{}”]
HDMI to HDMI cable to connect your capture card to your camera HDMI adapter.
The simplicity of using this HDMI cable makes this setup upgradable without having to pull things apart in your setup
Link: https://amzn.to/3TYH7zd
[/et_pb_blurb][/et_pb_column][et_pb_column type=”1_4″ _builder_version=”4.17.4″ _module_preset=”default” global_colors_info=”{}”][et_pb_blurb title=”Adapter: Micro HDMI to HDMI” url=”https://amzn.to/4dyllti” image=”https://homestudiomastery.com/wp-content/uploads/2024/10/image-7-300×300.jpeg” _builder_version=”4.17.4″ _module_preset=”default” link_option_url=”https://amzn.to/4dyllti” global_colors_info=”{}”]
Micro HDMI to HDMI adapter connects to your camera and the HDMI cable.
Make sure to choose the “Left Angled” adapter for your Sony Camera
Link: https://amzn.to/4dyllti
[/et_pb_blurb][/et_pb_column][/et_pb_row][et_pb_row _builder_version=”4.17.4″ _module_preset=”default” global_colors_info=”{}”][et_pb_column type=”4_4″ _builder_version=”4.17.4″ _module_preset=”default” global_colors_info=”{}”][et_pb_text _builder_version=”4.17.4″ _module_preset=”default” global_colors_info=”{}”]
4. Audio Setup
High-quality audio is just as important as clear visuals. The SHURE MV6 microphone is brand new entry among podcasters and video creators, offering crisp and professional audio. Pair it with a tripod or desk arm for better positioning, making sure your voice is captured clearly without background noise.
[/et_pb_text][/et_pb_column][/et_pb_row][et_pb_row column_structure=”1_3,1_3,1_3″ _builder_version=”4.17.4″ _module_preset=”default” global_colors_info=”{}”][et_pb_column type=”1_3″ _builder_version=”4.17.4″ _module_preset=”default” global_colors_info=”{}”][et_pb_blurb title=”Mic: SHURE MV6″ url=”https://amzn.to/47ZkKzt” image=”https://homestudiomastery.com/wp-content/uploads/2024/10/image-9-300×227.jpeg” _builder_version=”4.17.4″ _module_preset=”default” link_option_url=”https://amzn.to/47ZkKzt” global_colors_info=”{}”]
This brand new microphone from SHURE is designed to not only work with your computer, but you can also use it to record very high quality audio with your smartphone as well. The new mic introduces USB-C connectivity.
Link: https://amzn.to/47ZkKzt
[/et_pb_blurb][/et_pb_column][et_pb_column type=”1_3″ _builder_version=”4.17.4″ _module_preset=”default” global_colors_info=”{}”][et_pb_blurb title=”Stand: SHURE Desktop Stand” url=”https://amzn.to/47ZkKzt” image=”https://homestudiomastery.com/wp-content/uploads/2024/10/image-10-278×300.jpeg” _builder_version=”4.17.4″ _module_preset=”default” link_option_url=”https://amzn.to/47ZkKzt” global_colors_info=”{}”]
The SHURE MV6 Mic comes with this Desktop Stand
Link: https://amzn.to/47ZkKzt
[/et_pb_blurb][/et_pb_column][et_pb_column type=”1_3″ _builder_version=”4.17.4″ _module_preset=”default” global_colors_info=”{}”][et_pb_blurb title=”Mount: Fifine Boom Arm” url=”https://amzn.to/47T3KL8″ image=”https://homestudiomastery.com/wp-content/uploads/2024/10/image-11-300×183.jpeg” _builder_version=”4.17.4″ _module_preset=”default” link_option_url=”https://amzn.to/47T3KL8″ global_colors_info=”{}”]
If a Desktop Stand starts to take over your desk, you can opt to get a desk mounted boom arm that’ll let you move it out of the way when you’re not recording content.
Link: https://amzn.to/47T3KL8
[/et_pb_blurb][/et_pb_column][/et_pb_row][et_pb_row _builder_version=”4.17.4″ _module_preset=”default” global_colors_info=”{}”][et_pb_column type=”4_4″ _builder_version=”4.17.4″ _module_preset=”default” global_colors_info=”{}”][et_pb_text _builder_version=”4.17.4″ _module_preset=”default” global_colors_info=”{}”]
Creating high-quality video content doesn’t have to be complicated. By choosing the right gear and following a clear, step-by-step setup process, you can have a professional video studio up and running in no time.
For those ready to dive deeper, the 7 Stages of Home Studio Evolution will provide all the insights and strategies you need to produce top-tier video content.
[/et_pb_text][/et_pb_column][/et_pb_row][/et_pb_section]
Ready to build the real thing?
When you're ready for a done-for-you studio, book a discovery call and we'll map a build that fits your space.